Profoto: Splash Attack, Pt. I

I love Profoto. I use their lighting equipment all the time on my shoots to achieve unique effects, and it’s always so cool to see them feature my work on their blog! Read the full article below, and don’t miss Part Two and Part Three.

Joe Morahan’s Colorful Splashes

Written by Ron Egatz on Monday, September 9th, 2013. Originally posted on The Profoto Blog.

morahan_visuals_waterbreak_final_009.jpg

Photographer Joe Morahan has been on our radar for a long time. We’ve covered his work previously, and his love of high speed sports photography hasn’t diminished since then.

Based in Denver, Colorado, we usually find Joe capturing athletes outdoors. He recently explained a series of indoor shoots which are no less impressive and action-filled than his outdoor work.

“This summer has been so hot, I think I subconsciously needed to do a shoot that reminded me of being a kid, looking for a way to stay cool – an erupting fire hydrant, a neighbor’s lawn sprinkler, a Slip-n-Slide… anything!” says Joe.

“I began imagining a shoot where I could combine my summertime prerogative of keeping cool with my background in high-speed industrial photography, and my current passion for creating sports photography and films.

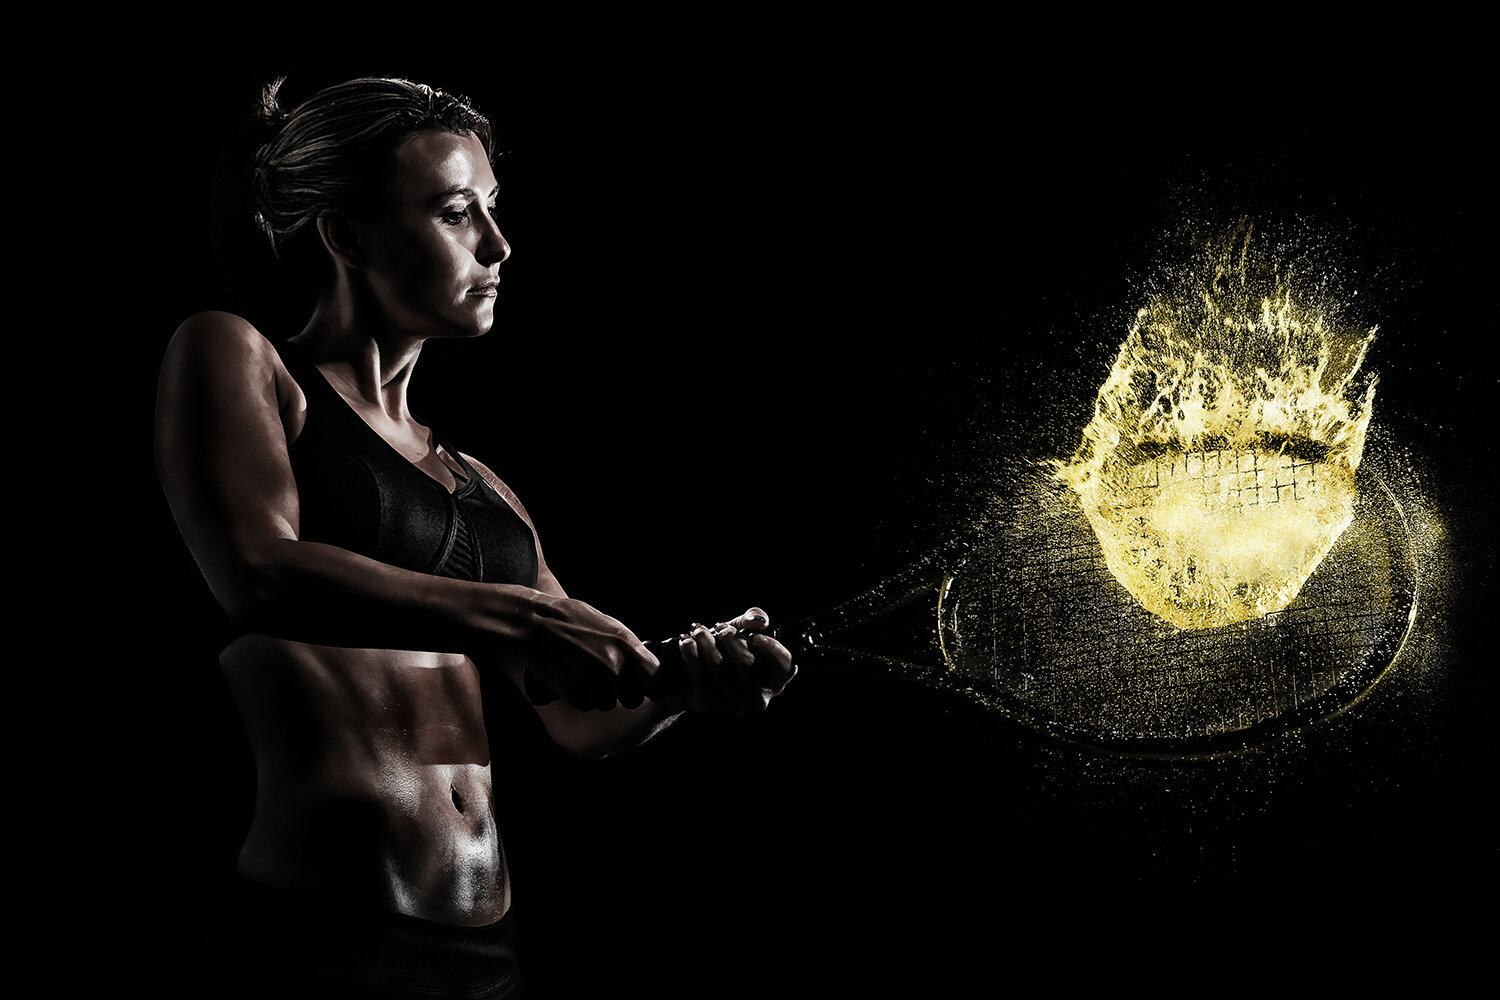
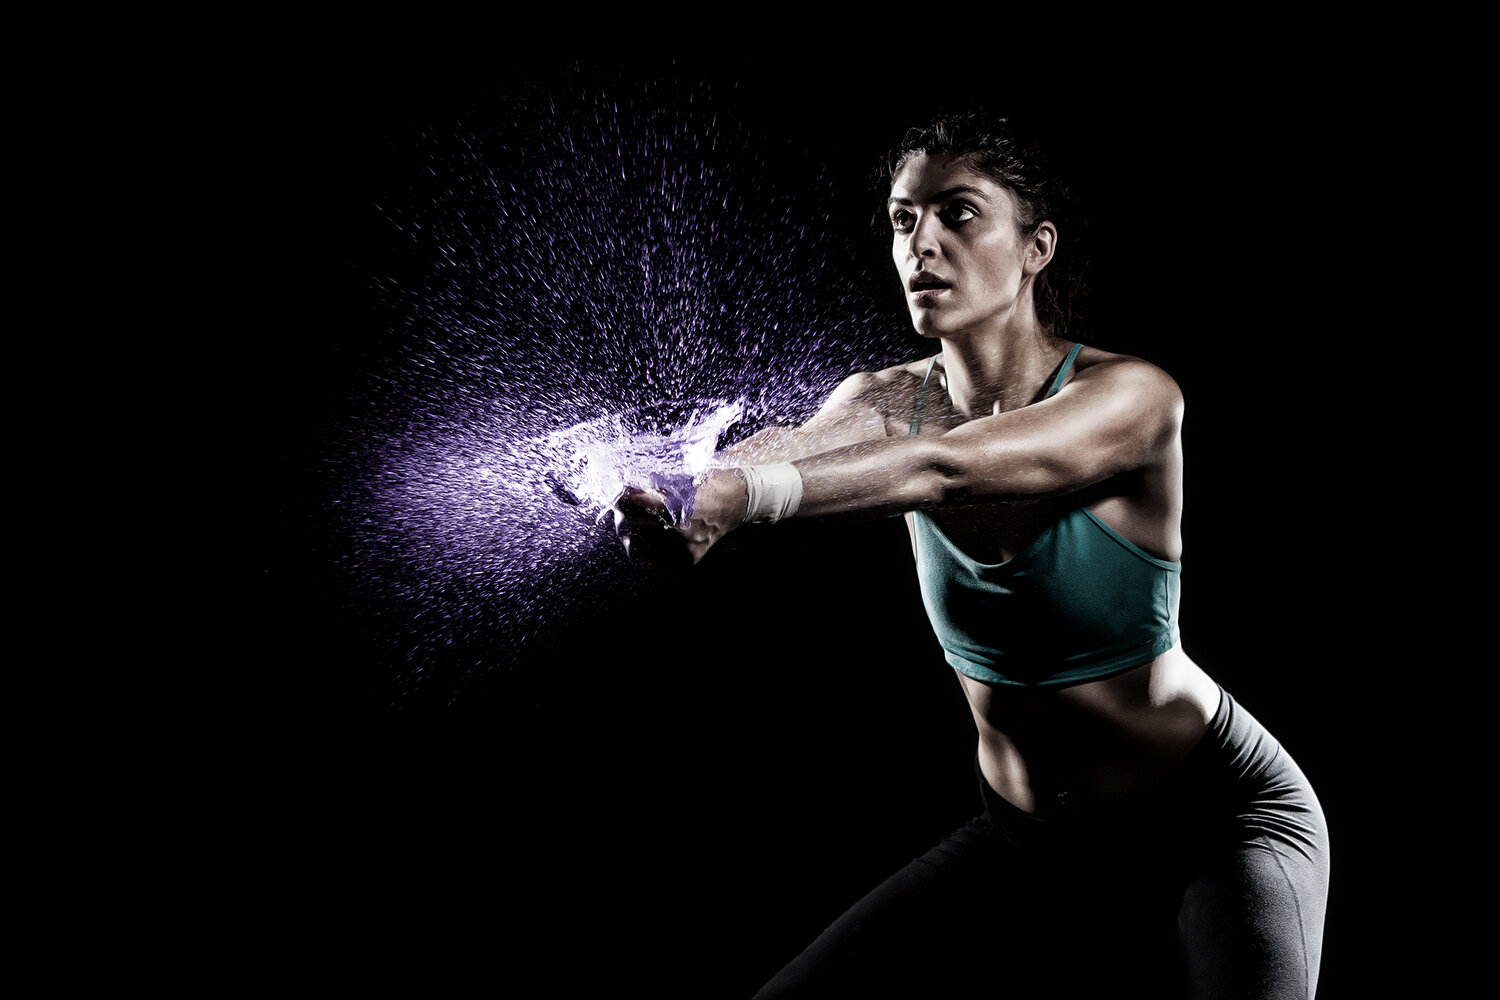
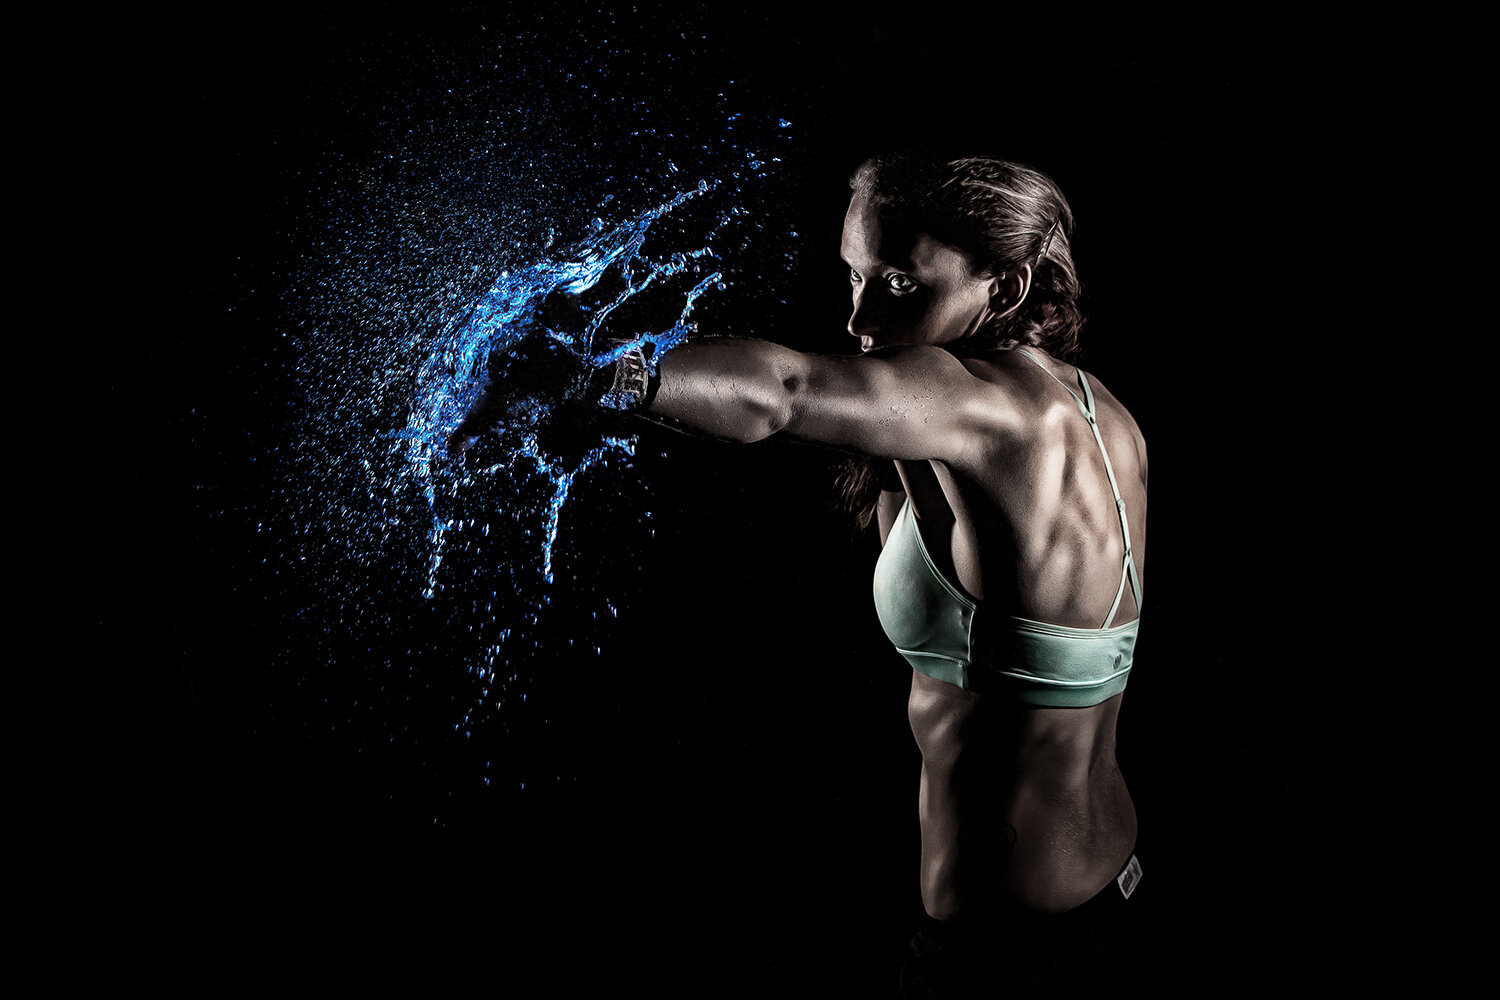
“Like many photographers, I keep an “inspiration” file going of cool techniques and styles. I soon found an image that was pretty close to what I wanted to achieve: a female athlete hitting a splash with a baseball bat. The effect was just as striking as I had imagined! I started to get really excited about using this technique in my sports photography, and taking it to a new level.

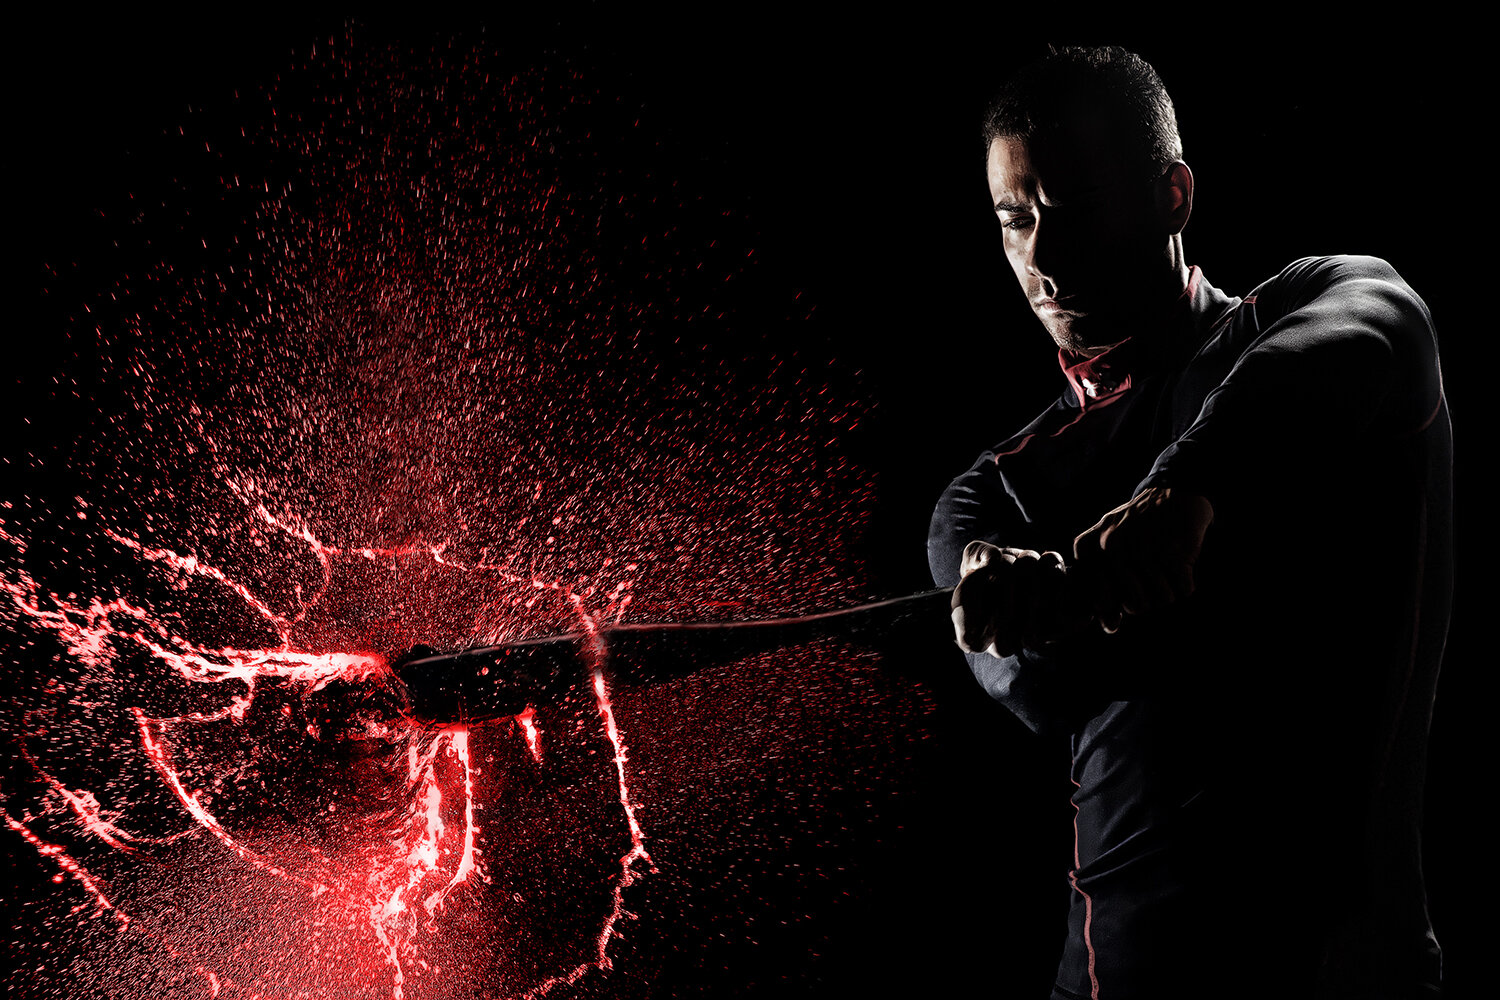
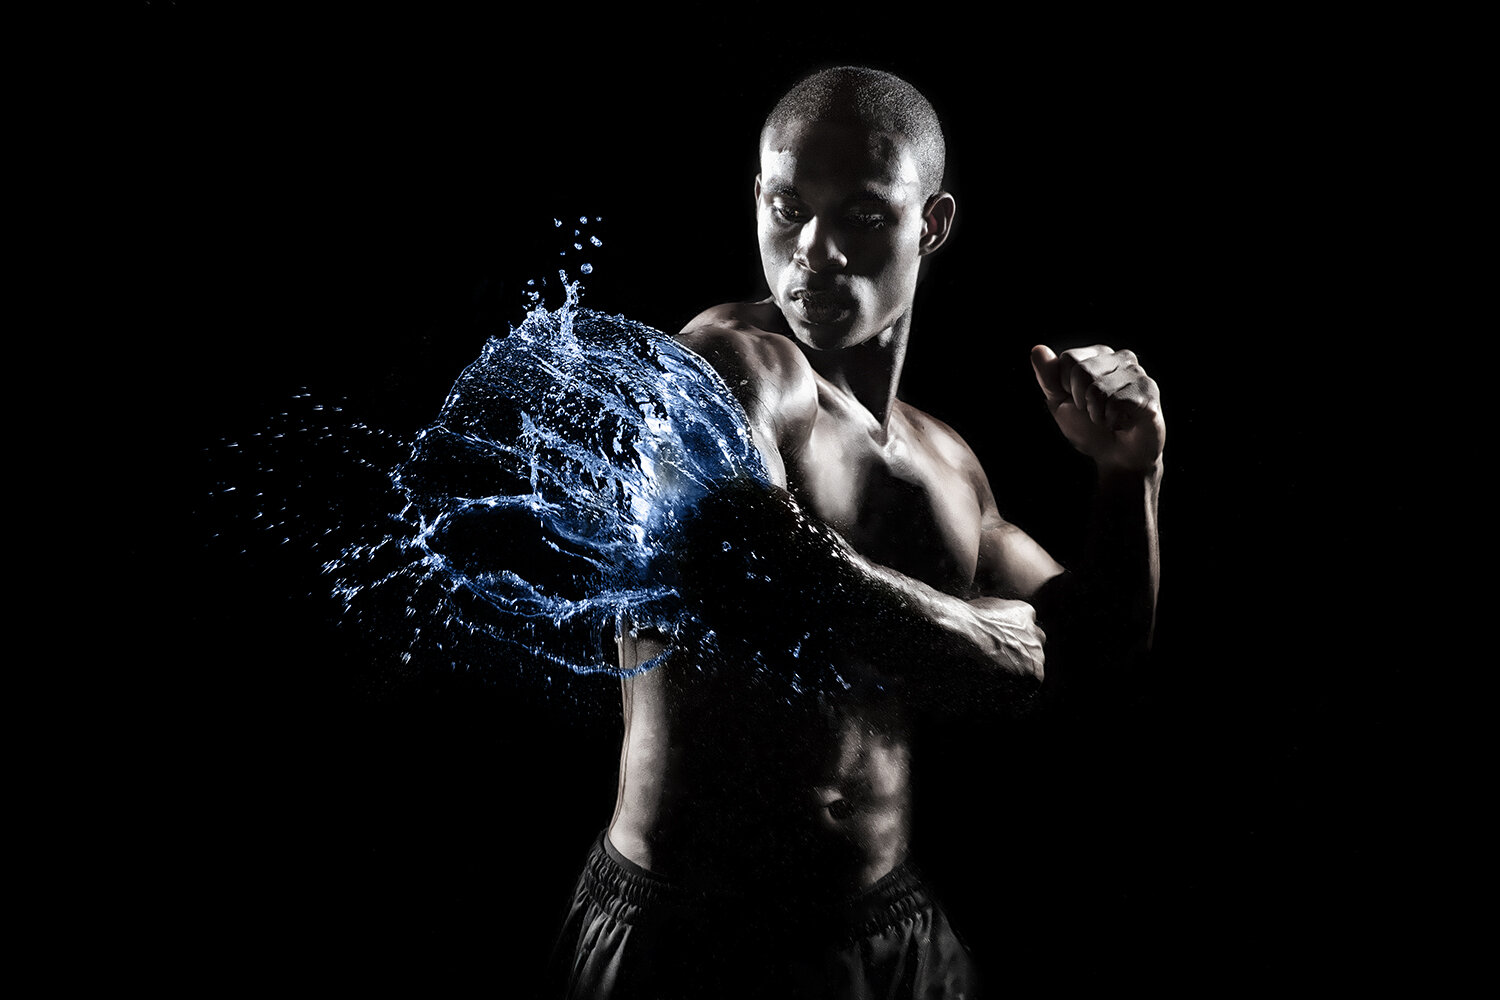
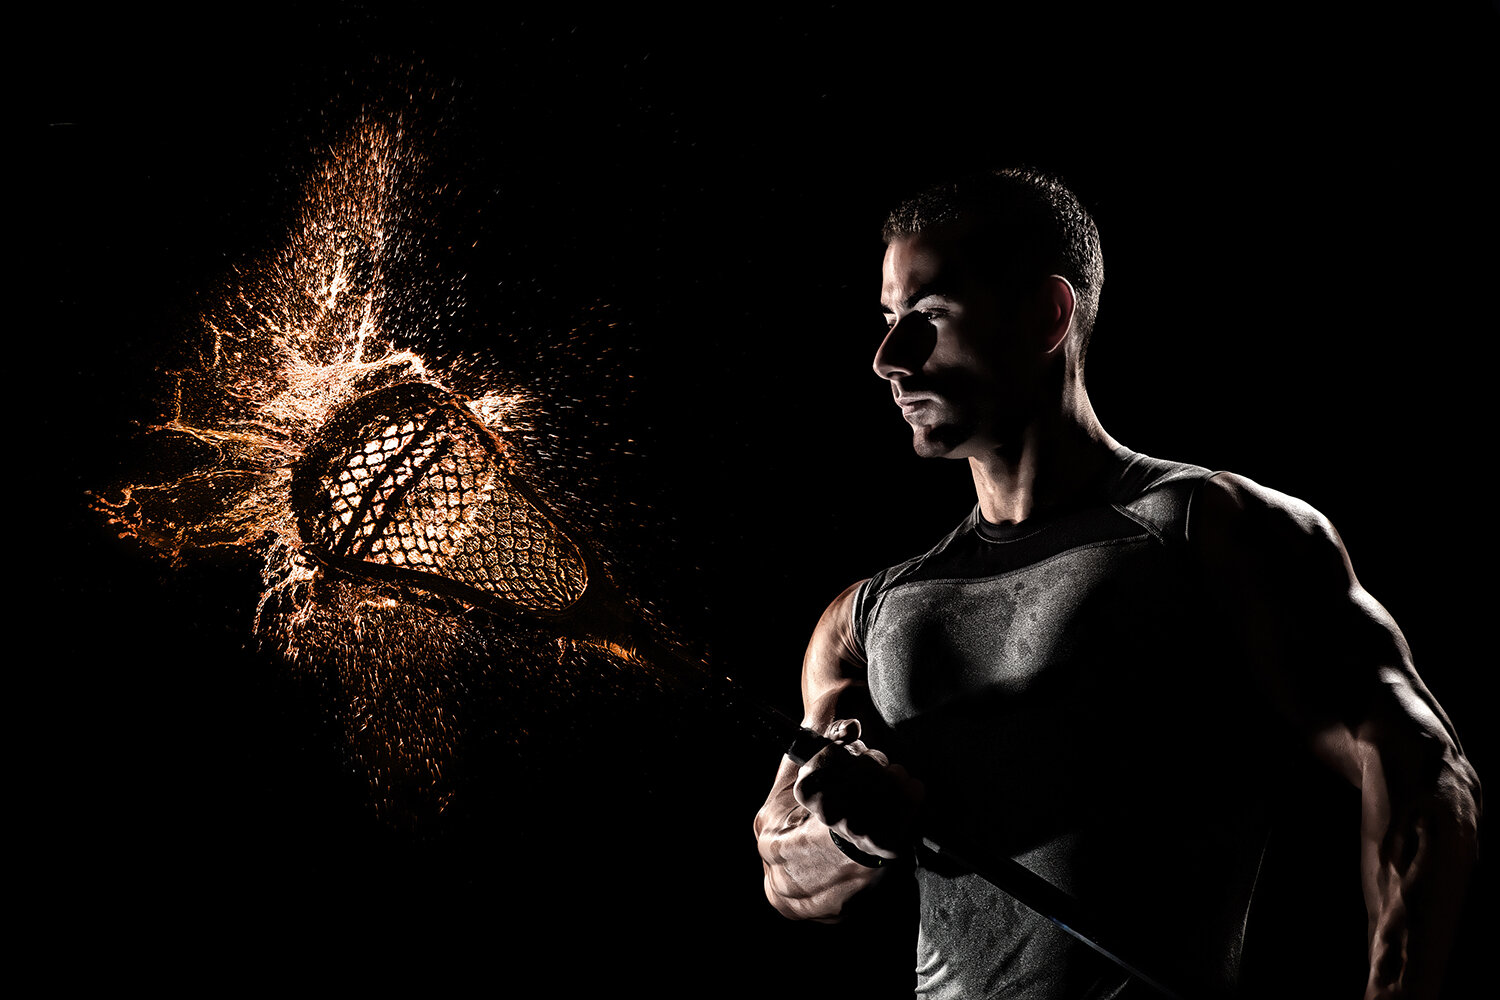
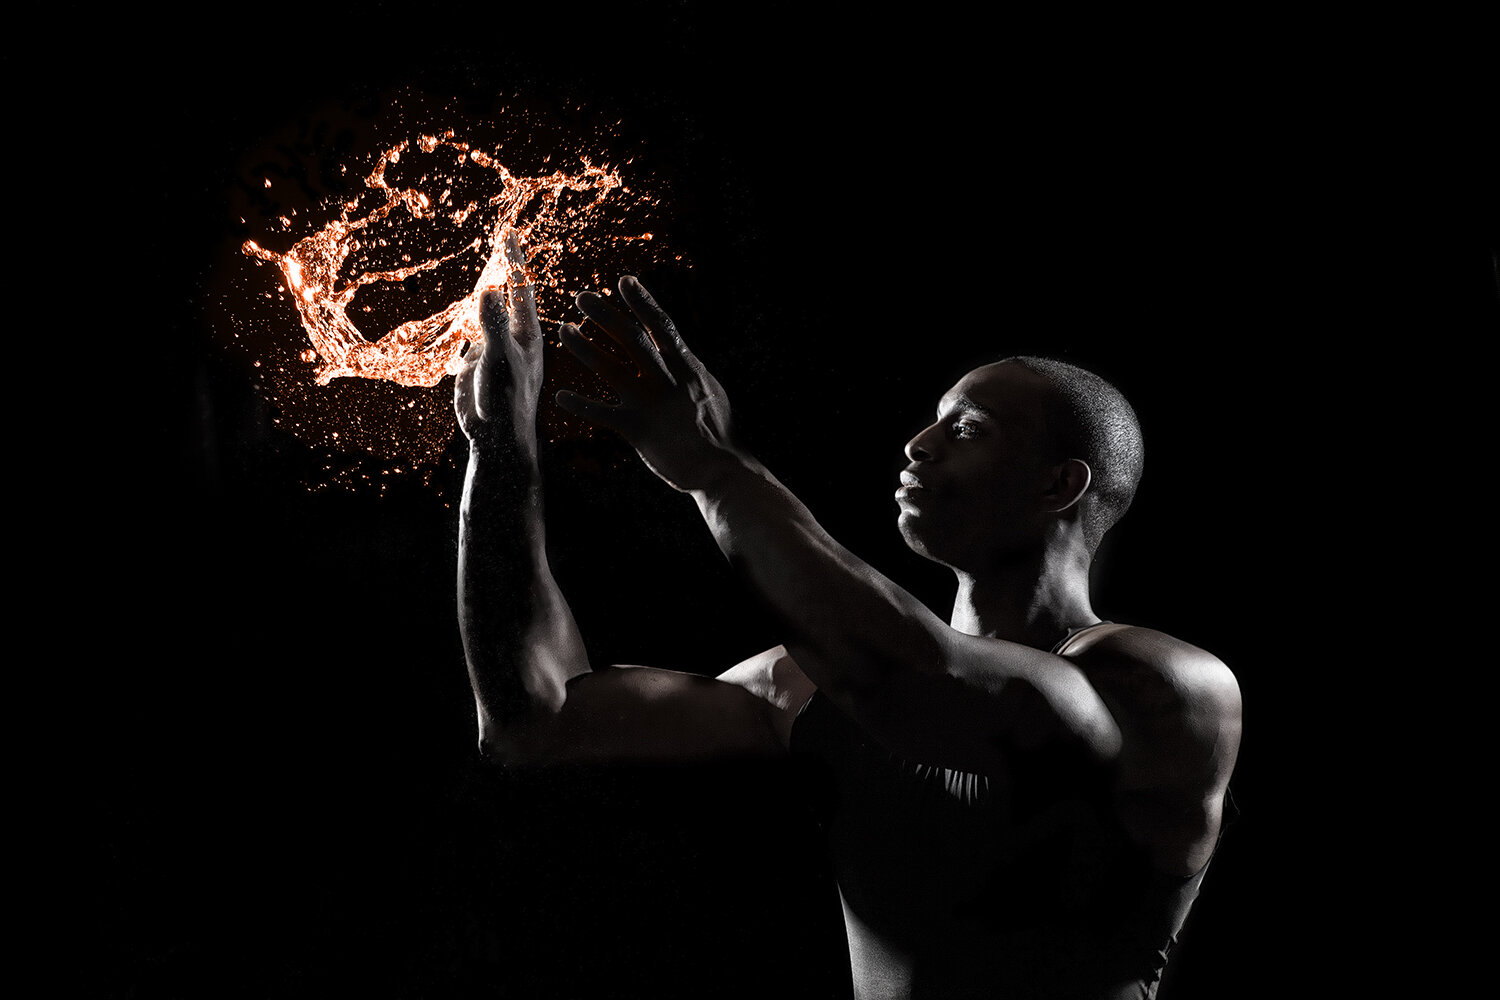
“I decided to apply the “splash” technique to several different sports, showing exploding balls of water – frozen at the moment of impact. This kind of shoot could be used in an ad campaign for sports drinks, illustrating the power of hydration in a really attention-grabbing way. I chose a pure black background and rim light to really highlight the shape and position of the athletes and the millions of tiny water droplets exploding around them.

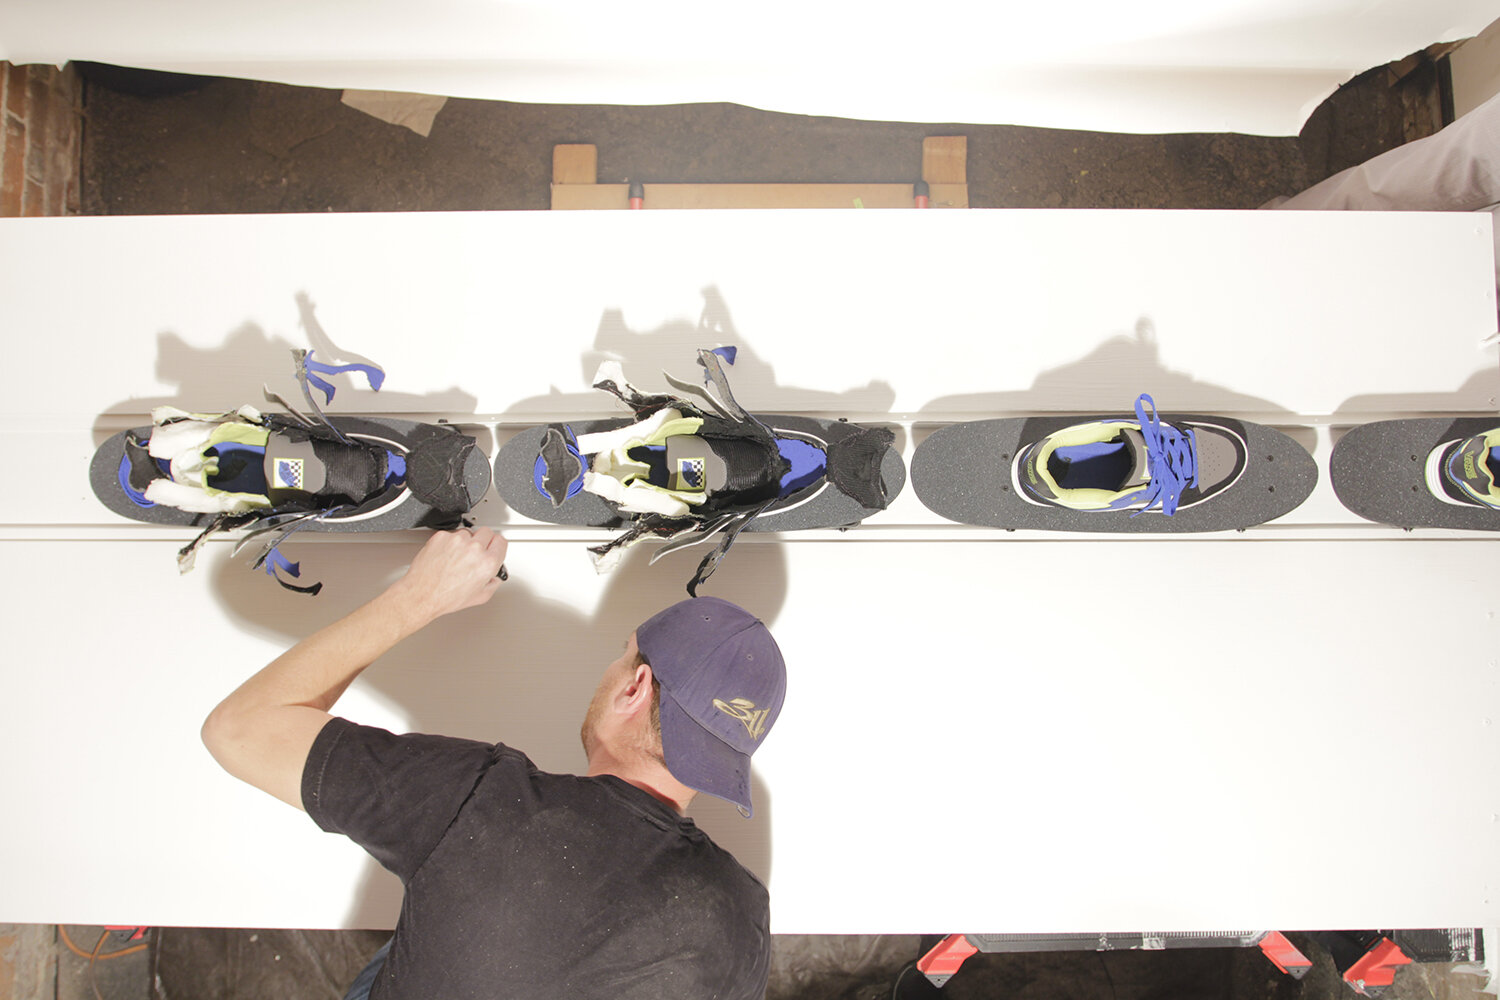
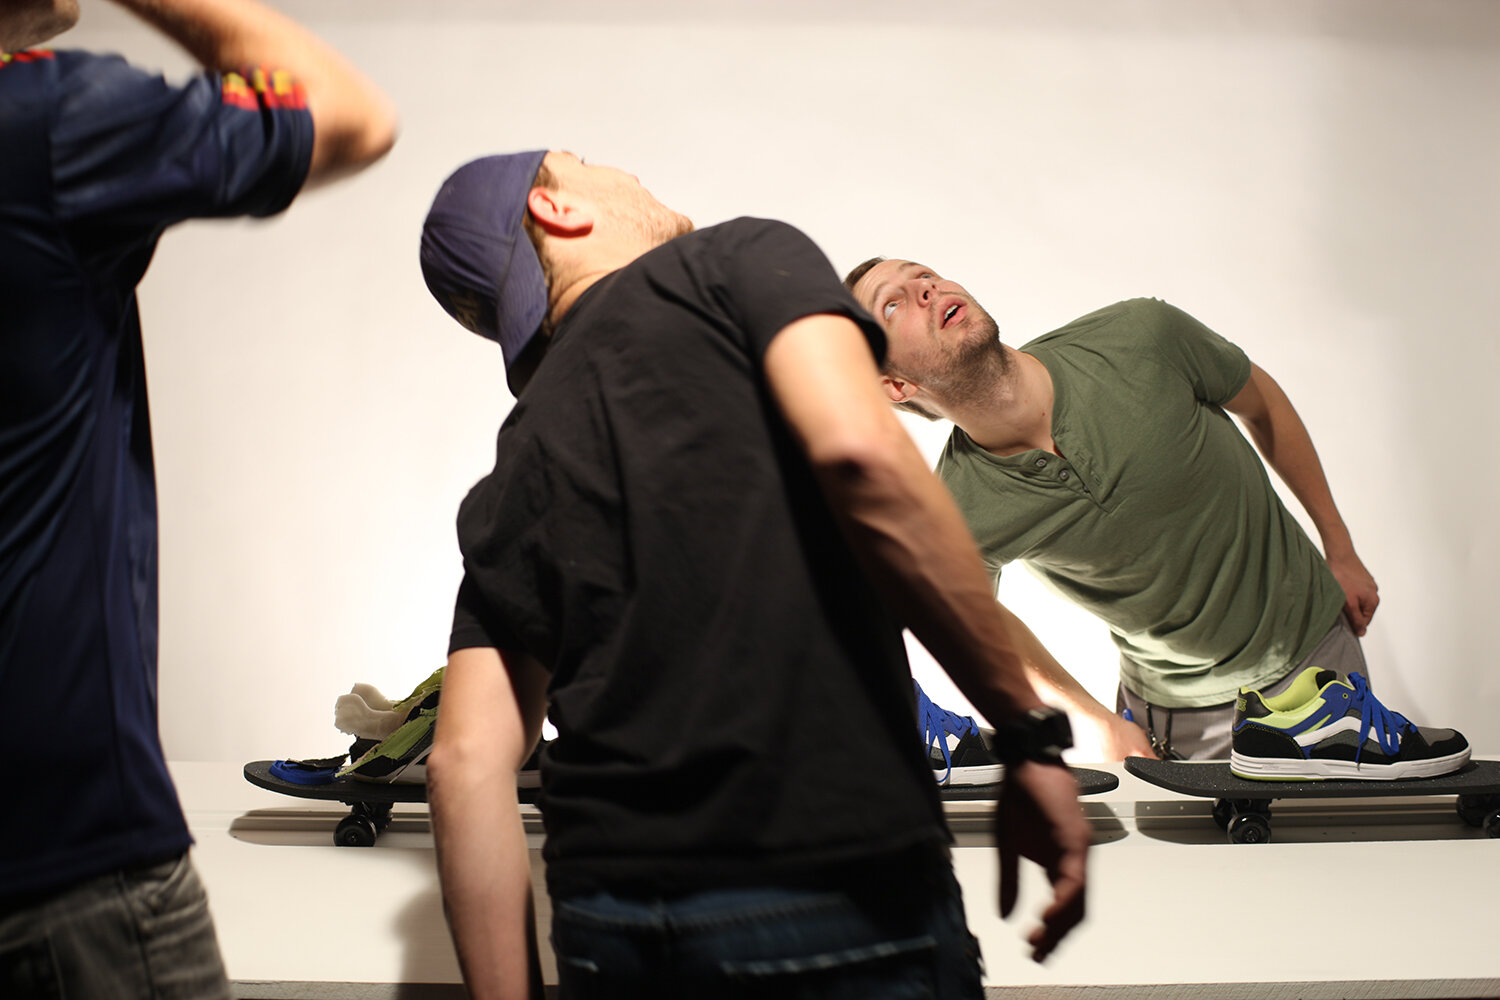
“Over the years, I’ve captured tons of splashes, drops and pours for landscape and tabletop shoots. However, I’d never applied this technique to humans before. Boy, did I learn a thing or two! Before a single model set foot inside that studio, I had my lights and camera settings locked down. Whenever I’m testing a new technique, I do a lot of “pre-modeling” before the talent arrives so they’re not waiting around, losing energy while I’m futzing. As you can see, I make a better photographer than a model!

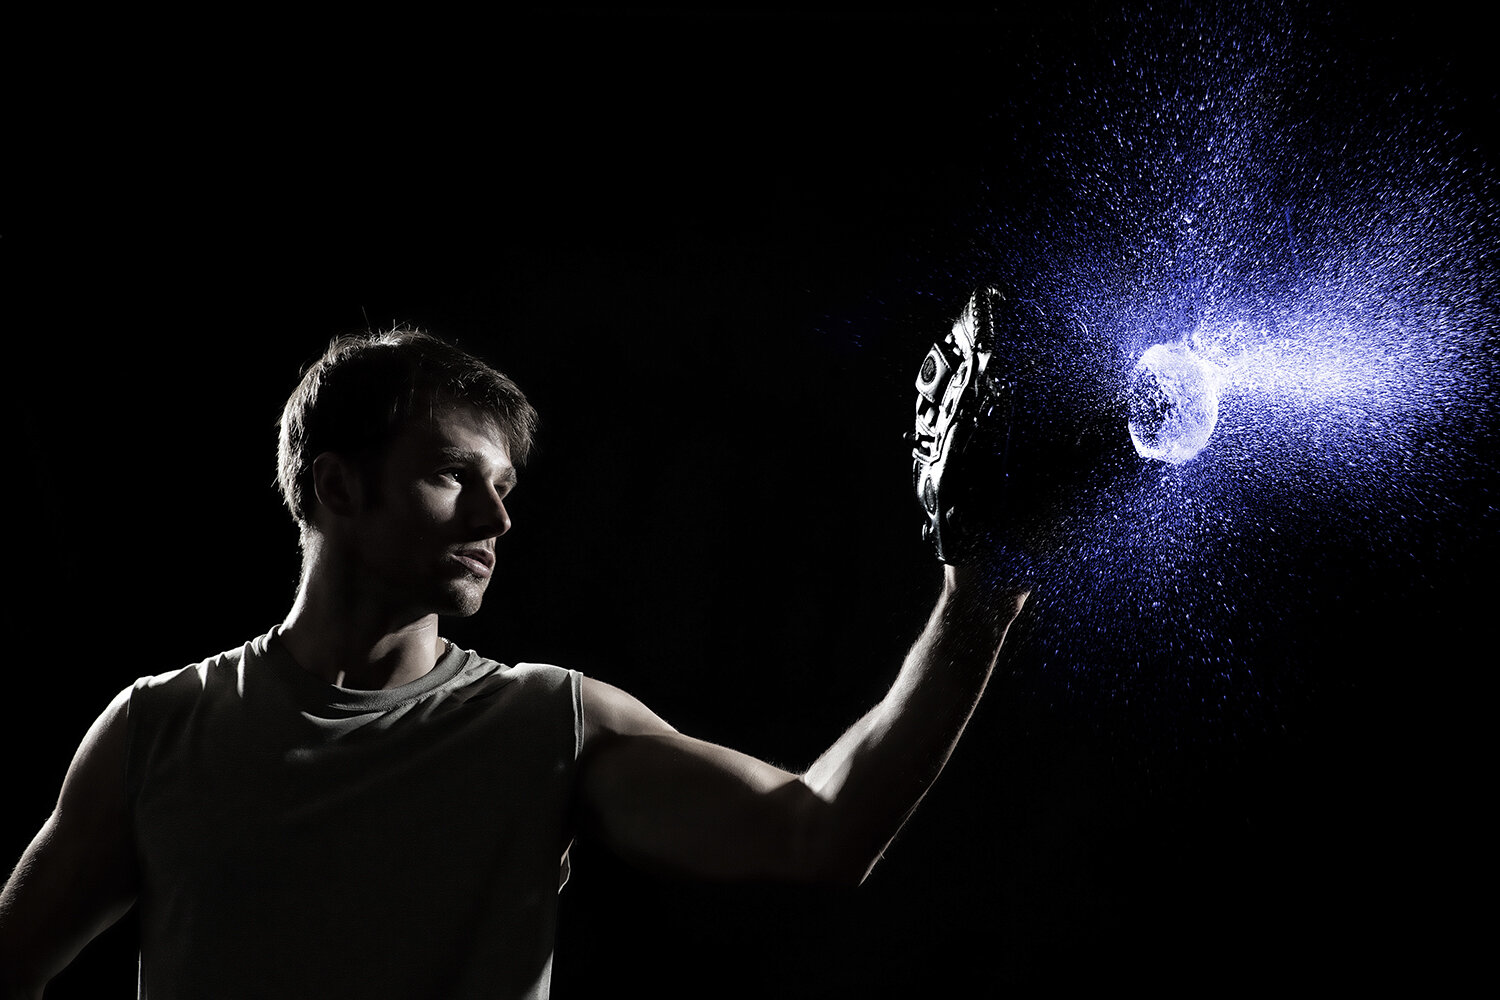
“On the technical side of things, I knew just what to do. To freeze the motion and the water, I powered down my Profoto flashes, almost to the lowest power possible. Next, I cranked up the speed. I knew I could count on the speed of my Profoto lights to capture just the right moment.

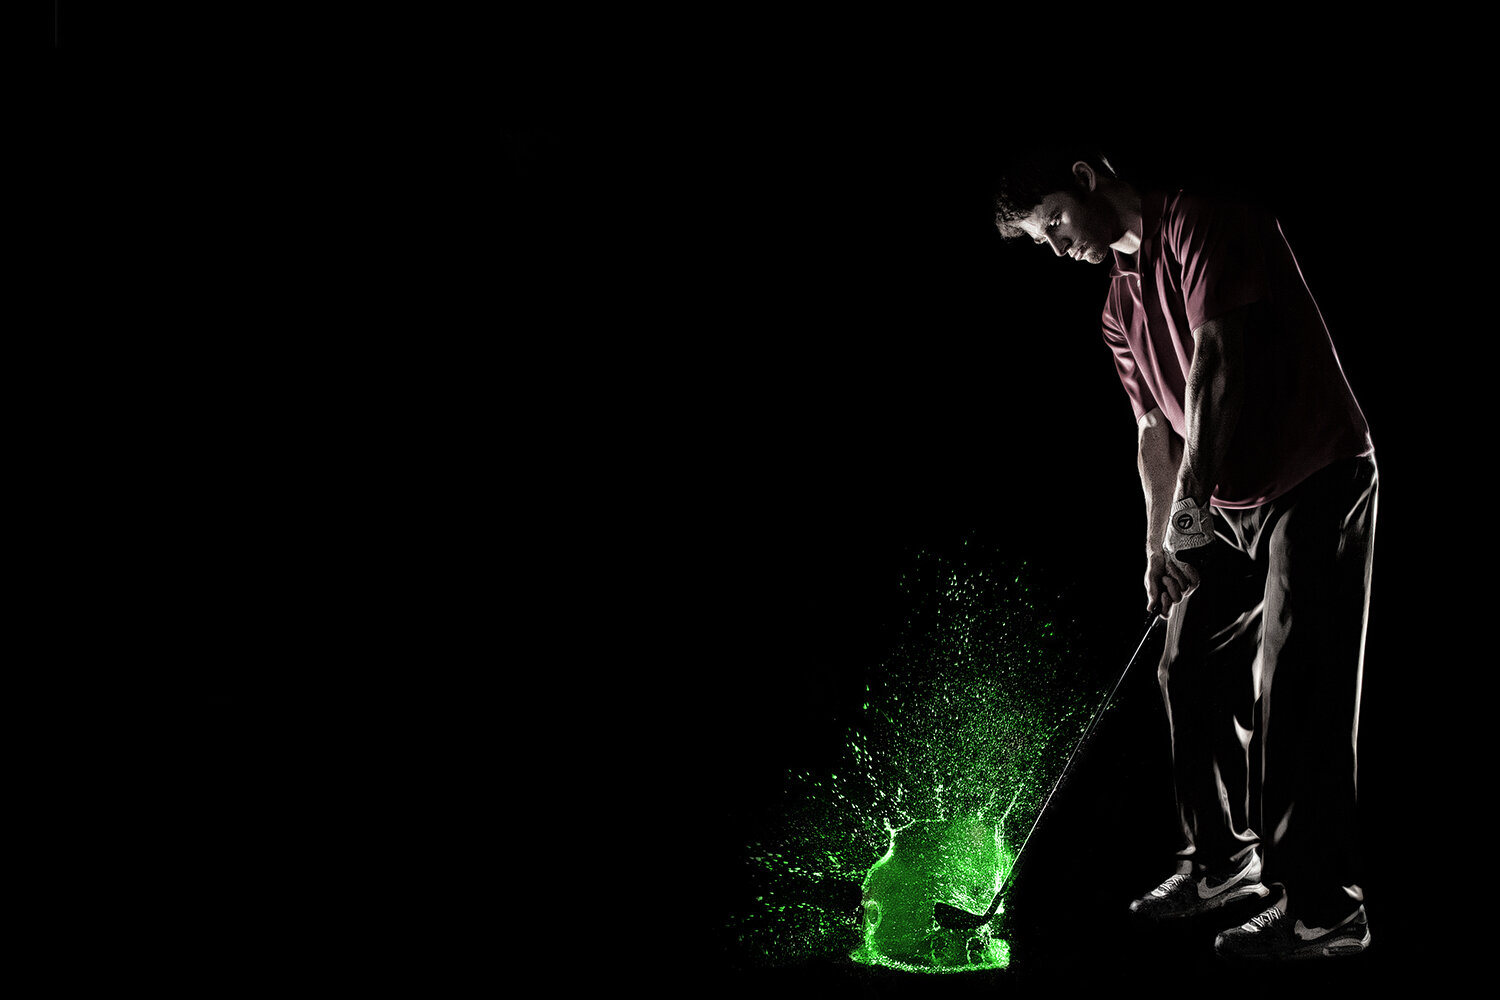
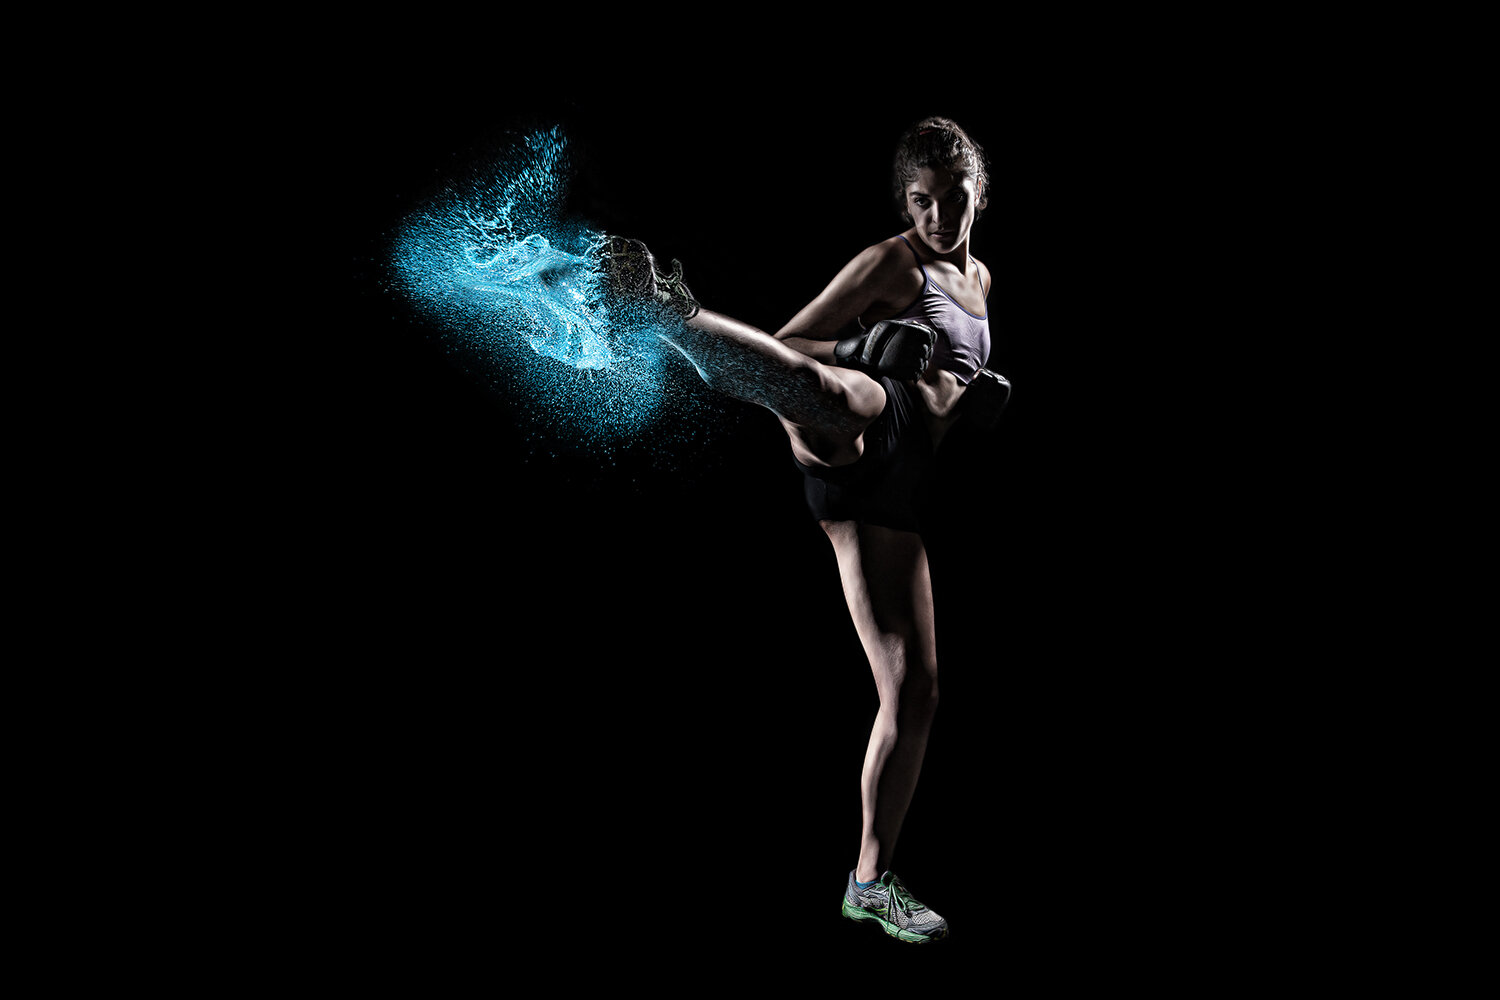
“To keep both the faces and the splashes of water in tack-sharp focus, I had to close down my aperture to f/8. With all the kicks, swings and punches, the splashes of water were often 18-24” in front of my model’s face. But when you stop down, you lose light. If you’re using diffusion you then have to kick up the power on your flashes, losing your fast flash duration. So in the end, I didn’t use any diffusion tools and instead, I swept the specular light across my models.

“The craziest challenge was keeping my beloved camera equipment and Profoto gear dry! I’ve dealt with water on-set before, but usually on a smaller scale or as rain falling from above… not exploding in all directions. Safety first, people. We made sure all power connections were lifted off the floor and covered everything in sight with trash bags.

“Ironically, with all that water flying around, my studio got incredibly hot and muggy during this shoot. These images are far more refreshing to look at than they were to produce! So much for staying cool this summer…”

Joe Morahan is an innovative and award-winning sports photographer, filmmaker and visual effects artist living in Denver, Colorado.

via The Profoto Blog.


Profoto: Splash Attack, Pt. II

Check out Part Two of my series of featured articles on The Profoto Blog! You can catch up on Part One here, and read Part Three here.

Joe Morahan’s Colorful Splashes, Part II

Written by Joe Morahan on Tuesday, September 24th, 2013. Originally posted on The Profoto Blog.

morahan_visuals_waterbreak_final_005.jpg

Two weeks ago, we published the first part of the story of Joe Morahan’s colorful splashes, in which Joe talked about his inspiration for the shoot and how it came to be. This is the second part, in which he gets down to the nitty-gritty details, in case you are crazy enough to try this at home. Here is the full story in Joe’s own words:

I’m no stranger to freezing motion. I majored in industrial/scientific photography at Brooks Institute. I’ve captured tons of speeding bullets and exploding objects using high-speed cameras and triggering devices. The great thing about photographing speeding bullets is that they’re fired using precision mechanics, making them incredibly consistent. It’s all about known factors, and getting your calculations right. Once you know the speed of the bullet, the time it takes to reach an object, and when to fire your flash and camera to capture just the right moment of impact, you can capture an almost identical image each time. Not so with a human subject!

Unlike a bullet with a consistent speed and trajectory, human beings have free will. They can choose to move in a million different directions, in a million different ways. Coordinating the movement of my model with the explosion of the water balloon created quite the math headache! No matter how hard the models tried to stay consistent in their movement and speed, the timing would differ in each take.

So how did we manage to get consistent enough results to create a whole series? Was it stubbornness? Insanity? It helps that I have a slightly obsessive attention to detail. With a lot of pre-production planning, a few on-set adjustments and a little bit of luck, I was able to capture the dynamic images in this series.

The easy part was locking down my exposure and flash duration. In order to freeze motion, I powered down my Pro-B2 all the way to get the fastest flash duration possible. To keep the light strong, I used no diffusion or other light modification that would limit the power of my Pro-B2 — only a few black flags to prevent lens flare or light contaminating the backdrop.

However, because strong, specular light can be unflattering to even the most attractive among us, I chose to sweep my lights from behind, creating a rim light effect. Combined with pure black backdrop, this setup highlighted the shape of my subject, and the low-key tone added drama to the scene. The biggest challenge with this lighting choice was making sure the model didn’t accidentally block light from falling on the water balloon as it exploded.

My Pro-B2 was rigged to my camera via cable, which I found to provide the most consistent results… a must when you’re dealing with so many variables. My favorite toy on set was the Ubertronix Strikeforce II triggering device. I love these little guys! They’re an essential piece of equipment for industrial/scientific photography, because you can adjust delays in nanoseconds. For this shoot, I chose the laser beam trigger option, set about 5 inches behind the water balloon, with a delay of 50ns to capture the maximum splash.

To explode the water balloons, I attached sharp tacks to my models or their sporting equipment — wherever the impact would happen. This allowed the models to strike with far less force, giving me more time to catch the action on-camera. To eliminate some of the consistency problem discussed earlier, I hung the water balloons from a thin, stiff wire. This way, I only had to deal with oneinconsistent element — the human subject. Although it would have been fun to throw a bunch of water balloons at an MMA fighter armed with rows of sharp tacks on her knuckles…

I’ve never been one to think I know everything, but this shoot was full of fun an interesting challenges. It seems the more I learn, the more I realize I still have more to learn.

The third and final part of the story will be published later this week. You will find the first part here.

Profoto: Splash Attack, Pt. III

Check out Part Three of my series of featured articles on The Profoto Blog! Catch up on Part One and Part Two

Joe Morahan’s Colorful Splashes, Part III

Written by Fredrik Franzén on Thursday, September 26th, 2013. Original posted on The Profoto Blog.

morahan_visuals_waterbreak_final_008.jpg

Two weeks ago, we published the first part of the story of Joe Morahan’s colorful splashes, in which Joe talked about how the shoot came to be. Two days ago we  published the second part, focusing on the actual lighting setup. This is the third and final part, in which Joe talk about the postproduction that went into the project. In Joe’s own words:

As any creative will tell you, you never really get over the rush of excitement seeing your vision realized. When I first closed my eyes and imagined this series, I wasn’t quite sure how I was going to pull it off. In the end it came down to luck — “when preparation meets opportunity.”

I’ve previously talked about how this body of work went from cool images floating around in my head to practical problem solving on-set. Now, I’m going to talk about the post-production and editing that gave my raw images that shot of adrenaline.

After several days of shooting, nearly a dozen models, thousands of water balloons, and buckets upon buckets of water on my studio floor, I was left with some really neat images. As a visual effects junkie, though, I always want to take my images to the next level. I’m not as interested in photojournalism or “straight” photography, as much as I am in telling a really dramatic and slightly surreal visual story. My favorite images always make me feel like I’m dreaming.

Although I love opening up Photoshop and having fun with my images, for this particular shoot I wanted a different look. I wasn’t sure quite yet what I wanted, so I turned to my know-it-all friend, the internet. Browsing around, I found the work of fellow sports photographer and Photoshop evil genius Kevin Conrad. He has a very slick editing style, and his skin tones and textures were out of this world. I had to hit him up, and see if he would collaborate with me on this project. He agreed, and the images turned out amazing!

The trickiest part of editing was selecting the colors to use for the splashes. Because I’d envisioned this as an ad for a sports drink company, we had a lot of leeway in choosing wild and unnatural colors! Where possible, though, we tried to use a relevant color, like in the tennis image where the water matches the color of a tennis ball.

It was important to use different colors in each image, since the lighting was so similar and in some cases we used the same model for multiple sports. The unique colors really help each image stand out from the rest of the series.

Kevin’s editing really shines in these minimalist images. With pure black backgrounds, the eye is left to really focus on the athletes and the explosion of water droplets. To bring out the color of the water and prevent clashing with skin tones, Kevin desaturated everything but the splash. It also helped keep the images clean and really legible. I had a great time getting to know Kevin through this project, and look forward to our next collaboration!

Out of the group, my favorite images were the female MMA fighter kicking the water, and the baseball player hitting it out of the park. These images feel really dynamic and almost electric to me, and really capture the spirit of the series. To capture the roundness of the “baseball”, I took the shot about 50ms faster than some of the others, so the water didn’t have as much time to lose its shape once the surface of the water balloon was broken.

Looking back at the series — with all its challenges and triumphs — it was totally worth all those nights stocking coolers full of water balloons! The insanely muggy studio, though, I could do without. Maybe we’ll just shoot outdoors at night next time…

Catch up on the rest of this article: Part 1 and Part II.

PocketWizard: Joe Morahan Digs Vans

PocketWizard: Joe Morahan Digs Vans

May 2, 2013 By Joe Morahan

Featured on Pocketwizard.com: View at Pocketwizard
Written by Ron Egatz

vans_tight_800_px_gif_v2.gif

Joe Morahan Digs Vans

Vans Time-Lapse: Born to Roll from Joe Morahan on Vimeo.

Joe Morahan at Morahan Visuals in Colorado is seriously into time-lapse photography. He recently brought his Canon cameras to bear on a group of Vans footware and some skateboards, putting together this amusing and impressive footage.

What’s so impressive about sneakers getting stitched together? That’s a good question, but as any exceptional craftsman will tell you, the quality is not always indicative of what you see. It’s primarily what doesn’t go wrong which denotes superior skill, strong concept, and gorgeous aesthetic.


As Morahan points out in his behind-the-scenes blog post on the shoot, “PocketWizard just saved me hundreds of dollars.” How did this happen? By not having to physically pause eight cameras after each shot. Remote camera triggering with PocketWizard technology is used extensively in this video. If each camera needed to be physically handled, that would’ve allowed for even minor physical movement of them, and that would’ve forced he and his team to start over again from the beginning.

Perhaps that needs repeating. A film composed of countless still photographs (from seven cameras) which needed to be compiled in reverse order. Then, due to one bump of one of the camera bodies, all shots must be tossed, and the process would need to be started over from the very beginning. Arming each camera with a PocketWizard Plus II prevented this project from becoming a Sisyphean task.

“PocketWizard saved the shoot,” Morahan concludes.

It should be noted the Plus II has been replaced by the PocketWizard Plus III, although this job could’ve been done with either the Plus III or the new PlusX.


Morahan kindly provided us with a list of other gear he used:

Canon Cameras:
1Ds Mark III, 5D Mark II, 60D, 7D, 1D Mark II, 20D, Rebel XTi.

Lenses:
Canon Lenses; Zeiss Lenses

Lighting:
Husky

Other Photo Gear:
Lowepro, Hoodman, PocketWizard

Morahan’s finished Vans film can also be seen on his blog. In the coming months, we will take a closer look at Joe Morahan’s career and some of his other innovative projects. Stay tuned!

MorahanVisuals

MorahanVisuals Blog

MorahanVisuals on Facebook

Joe Morahan on Twitter

March 21st, 2013

Production Hub: Innovative Storytelling at its Best

The following post originally appeared on Production Hub.

Innovative Storytelling at its Best

morahan_visuals_ipad_2015_00006.jpg

Q: How did you first get involved in motion graphics and still photography?

A: I was in high school when I discovered my love for taking pictures, and first got serious about still photography. However, it wasn’t until after high school — when I was working room service at the local hotel — that I decided to do something about my passion. I quit my job and moved to Santa Barbara, California to attend Brooks Institute of Photography. My favorite projects at school involved sports, high speed action, innovative camera techniques and blowing things up. The industrial and high speed photography skill set that I developed at Brooks came in handy as I began my career in sports photography and motion.

Q: Can you name a few of your clients? What has been one of your favorite projects to date?

A: One of my favorite projects was contributing to Red Bull’s Signature Series. The promo was shot by Scott Duncan, but I did the supporting time-lapse shots. The best part of the project was just hanging out and shooting in Breckenridge for days on end. The nights were freezing, but that’s when I was shooting most of my time-lapses: icicles being formed, water freezing, crystals forming, and a lot of really cool details that I’d never really captured before. Unfortunately, Otherfilms had too much footage to cram in a short promo, and only a small portion of what I shot ended up in the promo. Afterward, though, it was pretty cool seeing my work on TV. I loved it!

Q: What has been one of your most challenging projects and why? How were you able to overcome it?

A: My most challenging projects are always my personal projects. When I’m shooting for myself, I’m pushing myself to try new things and go further than I have gone before. Sometimes I fall short of my crazy high expectations, but I keep pushing forward and end up learning amazing techniques and strategies that I then bring to my commercial and advertising work. 

Of these personal projects, my most difficult was the spec ad spot I did for Vans, in which the shoes are put together on an assembly line made of skateboards. We used a stop-motion reverse time-lapse technique to achieve this concept. To show the shoes being constructed, my team and I had to carefully and methodically deconstruct the shoes — stitch by stitch, frame by frame. The time-lapse had to be played in reverse, so we had to reverse our entire process and shot list. Talk about a head trip! We also had to make it look like a factory where the shoes were assembled on skate boards, and be able to put it all together as a seamlessly looping file. Thirty-six hours of shooting time and tens of thousands of frames later, we wrapped the shoot and sent the files off to editing. There were so many unique challenges in this project, that at times I wasn’t sure if it we were going to be able to bring my vision to life … but we did it!
blog.morahanvisuals.com

Q: Where did you learn your skill set and what advice would you give those who are trying to succeed in the production world?

A: Brooks Institute of Photography gave me the strong fundamentals and tools I needed to be a successful photographer, but I would be the first to say I have learned far more in the real world, than they could have ever taught me in school. Sometimes, shooting can be a series of trial and error, experimenting and learning from your failures. For every time-lapse I have created, there are far more that do not make the cut. You can’t be afraid to challenge yourself, or you’ll never grow as a photographer or filmmaker. I’m always pushing myself to learn, to think and to create.

Q: Where do you go to find inspiration for continual creativity?

A: My eyes are always open, taking in inspiration from the world around me. It might be a random YouTube video or photography site, or it might come to me during a walk or a camping trip. Inspiration is everywhere, and every time I think I’ve seen everything that has been done, I stumble across someone else pushing the limits. I’ve learned that I need to just live and be happy to be inspired … and the ideas just keep coming!

Q: Can you explain to us how you were able to create the two videos for Nike? (What elements it took to create the videos, etc.) 

A: The two videos below were spec ad spots I did for Nike. Like the Vans video, they were some of those tough personal projects I mentioned before. A few years back I met a producer out in LA who inspired me to start shooting motion and pushed me to put together a motion reel. Without access to a Phantom camera (one of the few motion cameras I am super comfortable with) I had to rely on my training as a still photographer and began shooting time-lapse films. After shooting so many time-lapses, they’re pretty simple to me now and I knew I could create something special using that technique. 

Later on, I saw these videos of an artist pouring paint over boxes in these amazing layers and patterns, then lets them dry. The final boxes were pretty cool, but I thought it might be way cooler to pour the paint in reverse, revealing a product hidden beneath. Well, that’s how it all started! It took a lot of testing to figure out how to shoot a video of paint pouring in reverse. In every video, I like to add an element to surprise the viewer: a dimensional logo built into the set, or an object that starts to spin. The real difficulty of these shoots comes from the extreme sensitivity of the set. Think about this: there’s a spinning soccer ball being slowly transformed into a globe by a painter in the middle of a time-lapse, and if the ball, cameras or set is bumped, or the paint is spilled, the shoot would be ruined and we would have had to start all over again! You get one take, and that’s it. The pressure is intense, but I guess that is what’s so interesting about these projects — challenging myself to push past what was safe, rational or possible. When you’re shooting for a client, most times they may want you to play it safe and not take too many risks, so you don’t get that opportunity to really push the limits. That’s why my personal projects are so important. I have no problem putting it all on the line in hopes of going further than I have ever been before. 

Q: What equipment do you use to create your photos, videos, etc.?

A: These videos were shot strictly on Canon cameras: EOS 1Ds Mark III, EOS 5D Mark II, EOS 1D Mark II, 20D, Rebel XTi, and for the Vans video I also used the EOS 60D and the EOS 7D. I used Hoodman CF cards for each camera, and simple hot lights for lighting. I used Adobe Photoshop to order, organize, and touch up each individual image.

A Sporting Life: Getting the Viewer to Wow

The following blog post originally appeared on A Sporting Life.

Getting the Viewer to Wow | Joe Morahan

Joe is a sports filmmaker and photographer from Colorado. His award-winning work has garnered him a reputation as one of the most creative and passionate image-makers in print, motion and effects.


“Normal” just isn’t in my nature. I’m constantly pushing my imagination and techniques to create something new, different and mind-blowing. If the viewer isn’t saying, “WOW!” then I haven’t done my job.

I began my career shooting high-speed, time-lapse and highly technical still photography projects, which led to a successful career as a sports photographer for advertising and editorial clients. Recently, I’ve integrated more motion work into my portfolio. Whether it’s stills or motion, inspiration can come from many different sources — backpacking trips, YouTube, or just focusing on my “dream clients” and what videos they need.

For this recent series of time-lapse films, I was inspired by an artist who poured layers of paint over a box, creating these amazing patterns which would then dry and be sold as art. This triggered something in my brain and I began visualizing a product being revealed from beneath paint, using a reverse time-lapse technique. For each video, I included a surprise, whether it’s revealing a hidden logo, or a set element that starts moving. Three of these projects have been released on my blog, each of which were made possible by my extremely talented team!


Reveal (the video above) was shot as a spec ad spot for Nike’s Mercurial Victory II FG Football Boot. The preproduction on this shoot was insane! Because it was one of the first times I’d poured gallons of paint over my set, I did this as a personal project. This allowed me time to thoroughly test the components and techniques and get all the stupid mistakes out of the way. I used five Canon digital cameras on this shoot, one of which was mounted to the ceiling, and used three shoes in varying colors and designs. I did shoot motion for this project, but the final edit contains only time-lapses from still photography cameras. The two main camera angles were captured by my EOS 1Ds Mark III and a 5D Mark II, which gave me a super high resolution that gave me plenty of editing headroom. The still frames from this shoot can actually be used for print campaigns! Over the course of several hours, I shot about 30,000 images. In post-production, I organized and corrected the images, which were sent off to the editor-magicians over at OTHER films.


The second video in the series, One World, One Ball features the Nike Total 90 Tracer soccer ball. I wanted to show the unity embodied by this one ball, used by people from around the world to play the most popular sport on earth. During the time-lapse, the paint gradually reveals the ball, which spins around and transforms into a map of the world. Again, we used a five camera setup with one camera mounted to the ceiling, all of which were firing every few seconds. To get all the cameras to sync with the least amount of running around and tripping over tripod legs, I used a single intervalometer and a Pocketwizard transmitter on the main camera angle, which triggered the other cameras via Pocketwizard receivers. There were a lot of moving parts to juggle on this shoot — the set, the paint, the ball, the lights, the artist painting the ball. Once the paint starts flowing on set, there’s no stopping. If anything got bumped, it’s game over! Luckily, no red cards were pulled…


Born to Roll is the third video in the time-lapse series, and showcases the craftsmanship behind Vans shoes. I pushed the time-lapse techniques I’d been perfecting in the previous videos to a whole new level here. This shoot took 36 hours over two days, as we methodically deconstructed these shoes on-camera, stitch by stitch. It took a lot of patience, but the final video is worth the effort! An added challenge was making the video into a looping file, allowing us to use just a few shoes to create the impression of a never-ending assembly line. The pieces of the puzzle came together and I created some cool GIF files, too, which have some major applications for the future.

I love every second of these shoots! To be able to wake up in the morning and have a day of creative problem-solving with a great team, is pure awesome. I love filmmaking, though still photography will always be an important part of my work. I love putting stills together in Photoshop and creating something that might only exist inside my mind — a wild mashup of sports, landscapes, reality, imagination, creativity and a touch of visual effects. Something magical happens when I’m able to translate my visions into reality, when everything coming together and I’m able to see the excitement on people’s faces when they see my work.

The Photo Brigade: Creative Still Life Time-Lapses

The following blog post originally appeared on The Photo Brigade:

Joe Morahan is an award-winning sports photographer, filmmaker and visual effects artist living in Denver, Colorado. Since graduating with high honors from the prestigious Brooks Institute of Photography, he has shot for advertising and editorial clients including RedBull, Getty Images and Sports Illustrated.

Sometimes, I wake up and think: “Y’know, shooting regular product shots is just too easy. I know!! I’ll pour some paint over my whole set — that’ll make things interesting.”


I’ve never been one to settle for “good enough.” Honestly, normal kind of kills me. The first motion project I worked on was so normal that my soul died a little inside. I needed to seriously amp up my creativity and push the limits of my imagination to be happy with my work.

The videos you see here have been years in the making — maybe even longer. The ideas behind them have been brewing in my head since I first starting learning time-lapse techniques back in school at Brooks Institute. I took tons of classes in time-lapse and extreme high-speed photography, and ended up majoring in Industrial and Scientific Photography. Funny as it sounds for a sports photographer, I never took a single Sports Photography class! I was obsessed with warping time, bending reality and testing the technical limits of photography.


Eight years on, I still love seeing motion sped up or slowed down. My first time-lapses were of nature and the night sky, out on camping trips. Before I ever thought about adding motion to my commercial work, I was just out there freezing my butt off and having the time of my life!

At the urging of one of my mentors, a producer in Los Angeles, I began to think about putting together a director’s reel and pursuing motion jobs. Motion is such an important part of the visual landscape now, and I couldn’t ignore that the industry was moving in that direction. It was time to jump out of my comfort zone and try something new. I decided to build a reel of around eight spec projects, each showing something unique, creative and representing who I am as an artist.

Like the honor student that I was, I threw myself into studying everything motion. I had worked with high-speed motion cameras before, but I knew that I needed to learn everything I could about motion to do it well. If I was going to do this, I had to do it my way. A little crazy, a little different — but definitely me.

As a creative, the most terrifying thing in the world is the blank page. Nothing came to me at all in the beginning, and I started to get nervous. I went out in nature, and remembered my night sky time-lapses from school. I messed around on YouTube, and eventually (after watching a few dumb cat videos) came across some videos of an artist pouring layers of paint over boxes, the dried product of which he sells. My brain started waking up and I thought about how cool it would be to use pouring paint in a time-lapse motion project. I had to make the idea my own and take it to a new (and admittedly crazy) level, so I came up with the idea to play the video in reverse, gradually “revealing” a product from beneath the paint.


Just like the paint pouring over my set, there was no stopping once I got started. Soon, I’d shot ten of these projects. With each project came a new concept, new challenges, new failures and new triumphs. I kept pushing the technique and pushing my imagination. My rockstar team and I had a lot fun making these videos; I hope you like the results!

Technical Information:

It was all cameras on deck when we went to shoot these videos. My Canon EOS 1Ds Mark III and 5D Mark II were the main cameras because they produce images of such an awesome quality and resolution that you can use the still frames in a print campaign. Additional angles were captured with my older cameras that I hang onto and refuse to sell: a Canon 20DCanon 1D Mark II and a Canon Rebel XTi. For the Vans video we had two extra angles captured by anEOS 60D and a 7D. One camera was mounted to the ceiling for overhead shots, but all the other cameras were setup on tripods. That’s a lot of legs!

Another fun problem you might have guessed is how to sync all those cameras to fire at the same time. I started out using multiple intervalometers on all the cameras, but my preferred method turned out to be using one intervalometer and a PocketWizard transmitter on the main camera and using PocketWizard receivers on all the other cameras to trigger the shutters in unison. This allowed me to stop all cameras with just the intervalometer on the main camera, instead of running around the room and up on the ceiling to shut off half a dozen intervalometers. This strategy was way simpler, and meant fewer chances to bump a tripod leg or the set — a time-lapse shooter’s worst nightmare.

To get saturated colors and maximize my depth of field with minimal noise, I used a low ISO and closed down the aperture as far as I could. For a few shots I opened up to f/1.8 just to mix it up and show a very shallow depth of field in a few frames of the final video.

Since I started out as a still photographer, my primary lighting kit contains strobes. Not wanting to pop those expensive bulbs thousands of times for a single project, I opted for a continuous light source. I wasn’t ready to make the financial commitment to a whole new lighting kit, so I went down to the hardware store and picked up some work lights. They’re cheap and easy to use. For diffusion, I mounted an old white pillowcase to a picture frame. My wife was horrified, but I was working with what I had. The pillowcase got a little singed, but we managed to not set anything on fire.

I did some calculations to ballpark how many shots I needed to end up with a full minute of footage that would play at 24-30fps. I figured that I needed about 1,800 shots per camera, and if I the shoot last six hours I needed to take a shot about every 12 seconds. I ended up playing it safe and taking a shot every 7 seconds instead. This was just enough time to run up to the set, drop a bit of paint and duck out of the way before the next shot. The intervalometer was crucial to capturing a consistent interval of shots. For the Vans shoot, we had to shoot every 11 seconds to give us more time to tug a stitch or nudge the skateboards. We ended up with more usable shots at the slower shot interval than if we’d set it at a 5 second interval and caught arms reaching into the frame.

Whenever you’re trying to do something new and different, there’s always a higher risk of failure. But you’ll never learn from your mistakes if you don’t fail, you’ll never fail if you don’t try, and you’ll never succeed if you don’t try. It’s all worth it for the final product and hearing someone say, “WOW.”

Via The Photo Brigade.


Morahan Visuals has joined the Hoodman RAW Shooters

I am very happy to announce that Morahan Visuals will now be using Hoodman RAW Compact Flash Cards exclusively!!!!!!

So I can’t even start to explain how very excited I am now that I have teamed up with Hoodman Compact Flash Cards.  Not only are they known for being the best/ most reliable cards out there, they are made right here in the USA!!!  If you are not familiar with Hoodman check out there website for all the details.   The RAW UDMA Compact Flash Cards are tested to 500,000 formats and that’s just the beginning. They are rugged, and will keep on working.  They cost a bit more than some of the others out there, being the mass produced cards, but Hoodman cards are worth every penny.  Most of the other card companies have around 2%-5% card failure, however Hoodman has 0 Card Failures!!!!  And that my friends, is why I trust Hoodman with my images.  When I travel to Africa, or hiking days through the Grand Canyon trying to get the shot, it would seem silly to save a few bucks on a card and have it fail on me, while I go through so much to create the images I do.  So that being said, this is why I have chosen Hoodman as my ONLY Compact Flash Cards.

I look forward to reviewing the gear and trying a few new tools that they slipped into my sponsorship package.  The one tool I have never used before is the HoodLoupe 3.0 Glare Free LCD viewing loop.  I used a loop all the time back in the day with the old 4×5, but I am really excited to use this.  I have a feeling it might get me to take a minute to view images, helping my mind slow down a think of other parts to the image, helping me create better images.  Of course it will help with the glare of the sun, especially that I mostly shoot outdoors.  So this will be a tool that I will use on every shoot.

Also sent to me use aHoodeye Digital SLR Camera Eyecup, that will help me fight the glare I face-off with everyday.  I look forward to seeing if this is something I can use from now on….I assume it will take a little getting use to but I will get it more than a far shot and see how things work out.

Of course I will need the best card readers around town to download all these cards that were sent to me, and to download,  Hoodman sent me a few card readers.  One is the RAW Professional FireWire Reader Designed for 42 MB/Sec UDMA CompactFlash Cards.  The other card reader is a USB 2.0 UDMA Reader RAW Professional Designed for 42 MB/Second UDMA Compact Flash Card; also supports CF, SD, and SDHC Card Formats.   From what I here, these cards readers blaze through downloads with maxim reliability, but also keep up a ridicules download speed.

And to top things off Hoodman sent me a handful of RAW 675X UDMA 6 Hoodman 8 GB CompactFlash Professional 500,00 Cycle Cards.  These babies will get there fair share of use.  From the travel, sand, salt, and all the other strange places I go creating imagery we will see how they do.  I have already had a few Hoodman cards and all have never given me one problem.  These should last a lifetime!!!

Look for more updates with Morahan Visuals and Hoodman Compact Flash Cards.  I will also now be featured on the RAW Shooter List on the Hoodman website.  www.hoodmanusa.com. To be on this list of shooters is beyond words for me.  This exclusive list of the finest photographers from around the world, and to be even mentioned on it is a really great step for my company.  So a big thank you to Hoodman for teaming up with Joe Morahan Photography!!!!

Filed Under: PressTagged With: HoodmansponsorsSports Photography